Tuesday 30 November 2010

Boots UV map for Keith

Keith asked me to UV map a pair of boots he had made for 'The Deep' during class and I agreed. Here are the shots.

Sunday 28 November 2010

Raven UV map for Clym

I was asked by Clym if I could UV map the raven model he is making. He is going to be creating a normal map for the model to capture all the detail from zbrush, hence he needed a UV map. Lookin back at the map now I would have changed a few of the seam positions, but there is minimal stretching so it isnt a problem.

Saturday 27 November 2010

Revised model - Finished

Here is the revised model, first picture is the model in zbrush and below that are shots of the model in the maya viewport and uv map. I have changed certain parts of the model as requested, made the dorsal fin one continuous piece and slightly changed his head shape. I also added a little more detail to the fins and fixed 2 of her teeth. The only part I was unable to change was the throat because as stated in a prior post, Zbrush went crazy and wasnt able to project the details properly onto the new mesh. So I will have to give the illusion of depth through the texture. I will speak to Andy about this too and see if he accepts that approach.

New model with changes (Problems :/ )

As was asked, I went ahead and added the changes to the model. I went into maya and changed up the the lowest division of the model, merging the sails on the back and adding some geometry for the throat. I then refined the UV map due to the changes in the mesh. I had some initial concerns about adding this geometry as sometimes it can be too extreme and Zbrush is unable to cope with the projection.

My worst fears were confirmed. Zbrush went crazy when I projected the high res details from the original mesh onto the new base. Smoothing and moving the mesh was not enough and I could not control the madness. I realised if I wanted to add the throat geometry a new model would need to be created, so I decided to get rid of the geometry and just fake the detail when I create the texture map. I will explain this to Andy and hopefully he will understand.


Comments from grp and Dan

I sat down with the group on thursday and showed them the Eel model and they all liked it, as did Dan although he raised the issue that it looks a little too much like a shark. So in order for the viewer and audiences to understand its an eel I was asked to just change the sail/fin on its back so it runs continuously without any gaps, and edit the head shape a little. Andy also asked if I could extend the throat area so it is deeper, I said I would try to.

Kid model for Heroes 1.0

I had started the character in Kofi's film, but after speaking to him and others we decided the original concept had to be changed as it did not look like a child. So this model has been put on hold and scrapped. I will now wait for the new designs and if they are approved I will get to work on the character asap.

Wednesday 24 November 2010

Final model( no textures) - Maya Viewport shots -

Heres the final model inside of maya with the normal map. This model consists of 14k polys and one 2k normal map. There seems to be an issue with not all the details from the original model in zbrush coming through in the normal map but that is quite minor. The eyes are placeholders for the time being as I need to decide how I want to go about getting the final look ( extra pieces for reflections, etc) but the teeth however, are final. I have not decided how I will texture those, either with PS or straight in maya with layered shaders. I will discuss with Andy and see what he thinks. I need to show this to the rest of the grp and get their thoughts on what I have done.

I will get the textures made soon as I first need to discuss some stuff with Andy before I move ahead any further. O and I have passed this model onto Clym aswell as some extra bits so that he will be able to get rigging whenever hes ready to.

Difference in polycounts

Right, so my original plan was to keep the model as low poly as possible, so I intended to use the lowest sub division level in zbrush as my base mesh (3k polys). However, after testing it out in maya and looking at the final result I was not happy with the look, it looked like it was very low poly and I felt that it would not be good enough for the film. There were problems around the mouth area with the teeth intersecting the mesh in wrong places, so I decided to make a higher version (14k polys) which was the second division up in zbrush. I tested this out in maya and noticed a big improvement in form and details so this is the version I have gone with for the final. It does a much better job of holding the details as there are more polygons to work with, there was no lag or chugging so everything seems to be good.

I also consulted with Clym about whether this would be ok and if he would face any difficulties but he said it was fine and everythings good to go.

Finished Zbrush model

Here are shots of the completed model in Zbrush. As you can see I kept it quite simple and stylised so its in keeping with the project. I usually have a tendancy to go crazy and make things look quite real so I am pleased I was able to get this looking right and not overdone. I tried to stick quite close to my original design and bear in mind what Andy told me throughout the design stage so that the model felt right. I gave him quite a few scars, scratches to show he has been through some rough times and is quite a deadly foe, his jaw is almost dinosaur esque which I think is interesting because Andy did say he could look like a prehistoric creature. Overall I think the model looks cool and i'm happy with it, I just hope the others are too.

Retopology and UV mapping

Below are shots of the retopologised mesh which has been fully UV mapped within Maya. I did the retopology in Maya and not Zbrush because I personally find the tools for retopo in zbrush quite basic and tedious. What I did for the retopology was drop down a few subdivision levels in zbrush, take the lvl 2 mesh into maya, delete the areas I wanted to redo and then create new loops. This worked out quite well and saved me alot of time.

I redid most of the head and parts of the fins as they needed fixing, and I spoke to Clym about how complex the topology should be. We actually agreed since the deformations will not be that extreme, the changes I had already done were sufficient. With that sorted I then proceeded onto the UV mapping which I did myself in maya. I did try to use UV master in zbrush but the results it gave me were not upto the quality I was after, so I decided to do it myself within Maya. As this is one of my specialist areas I blazed through this with no problems. The UV map itself is near perfect I would say, as there is close to no stretching or problem areas.

What I did next was reimport this mesh into the correct subdiv level in zbrush and refined the model as it needed a little tweaking.

Sunday 21 November 2010

Shots of model so far


I got the green light for my design from Andy and he said I could start modelling, so I have. The workflow I am using for the model is :

-build base mesh in maya
-go into zbrush, shape, add proportion and detail
-retopologise and refine
-add texture and export back to maya with normal map

I have posted shots of what the model looks like at the mo, and also a very rough mock up of the model with textures in an environment. I know that shot is quite crap but its purely a mock up. I am looking forward to having this character finished as I think it will look awesome.

Thursday 18 November 2010

Eel Final design


Here is the final design for the eel character. The textures and colours may change slightly but this is more or less how it will look. The front shot is quite rough and may change ever so slightly when I am modelling in maya. I will show this to Andy just to make sure he is happy for me to start modelling.

Final colour tests


Since the final design was established, Andy and myself spoke about what kind of colour schemes would be good to use for the eel. We liked something dark (a blue/purple perhaps) because it would be a good contrast to the bold bright colours of the penguin and child. So I did these three, of which number 2 was Andy's favourite so I went forward from that.

Monday 15 November 2010

Final design


Andy just saw the variations I did based on the design he liked and I did a quick mash up of them. I was told to mix certain parts between the 3 and I have come up with what is possibly the final design at the moment. I have got approval from Andy and I will now get to work on trying out some colour concepts. I should be able to begin modelling soon.

Sunday 14 November 2010

Getting closer to a final design.


I showed Andy the developed sketches and he told me he liked design 1 and the head especially. He also mentioned he liked the design because the overall shape wasn't too long. So I have done 3 more variations based on the designs he liked, I will get some crits and see what else could be changed/added.

Wednesday 10 November 2010

Some more development


I spoke to Andy earlier and he saw the developed sketches I posted up earlier. He said he liked them and preferred designs 1 and 2 because of the sharp angular forms which would contrast nicely with the soft shapes of the child and penguin. He also liked the fact I mixed a few elements from other marine life into my concepts. With this feedback I went back into Photoshop and did some more thumbnailing, from which I produced 3 more designs that I will show Andy tomorrow.


Developed Eel designs


So after receiving some positive feedback from the boss on Monday, I have gone ahead and started developing some of the designs Andy really liked. He mentioned to me that the bioluminescence on the eel should be an orange glow, and that the Eel could have a sort of prehistoric appearance. I have kept this in mind and I am trying to nail a design which gives off that badass/fear me look. I feel I am getting closer. Out of these four developed designs I can't seem to choose one I like the most, mainly because I can already visualize all of them in 3d, so its really upto Andy at this moment.

I have also kept these texture designs quite basic as I am not sure what is going to be preferred. Hence I have also provided just the lineart incase the colours prove to be a distraction.

Tuesday 9 November 2010

Initial designs & sketches


I have started designing the Conger Eel and I have been experimenting a lot with shapes and forms. The head is what I have been focusing on the most as I feel its where the heart of the character lies, through his face we should be able to instantly fear and understand his role in the story. I have been looking at exaggerating certain features such as the lower jaw to help make him feel more brutal and superior, and almost giving him a sort of inflated chest to show his prominence. I was also told by a friend perhaps he make look more scary if the eyes were glowing aswell, which I am going to experiment with next.

Moodboards


Here are some moodboards and images I have collected of Eels, as well as other marine creatures to help me generate some interesting designs. I was told by Andy, that our eel could almost have a prehistoric kind of look to make him look much more unique. I also looked at a variety of eel species to broaden my scope for designs.

Conger Eel Research


Here is some of my research that I have collected which has helped me familiarise myself with the character and animal in greater depth. I found out some interesting facts about Eels that I never knew, like the fact they have fins and their colour very much depends on the animals surroundings, an Eel will be a light brown colour in a sandy environment as opposed to being a charcoal grey in a rocky terrain. I am also quite fascinated with the bioluminescence that alot of marine life has, there are some quite interesting things we could do with it for our character.


First objective - 'Conger Eel' character

I have been given the task of designing and creating the Conger Eel character by Andy. He has asked me to come up with designs for the character, and once a final design is in place, I am to model, UV map and possibly texture the final model.

After going through Andy's original conceptual work and designs, I got a firm grasp on the style of the film and I began researching. I was given a few key points to bear in the mind about the character which helped in research, a key attribute of the character is that he has some sort of bioluminescence which means he will be able to glow in the dark.

Welcome.

For this year I will be part of Andy's group working on 'The Deep'. I am also going to be doing work for Kofi's film 'Heroes 1.0' (mainly character modelling).

My roles for the groups are:

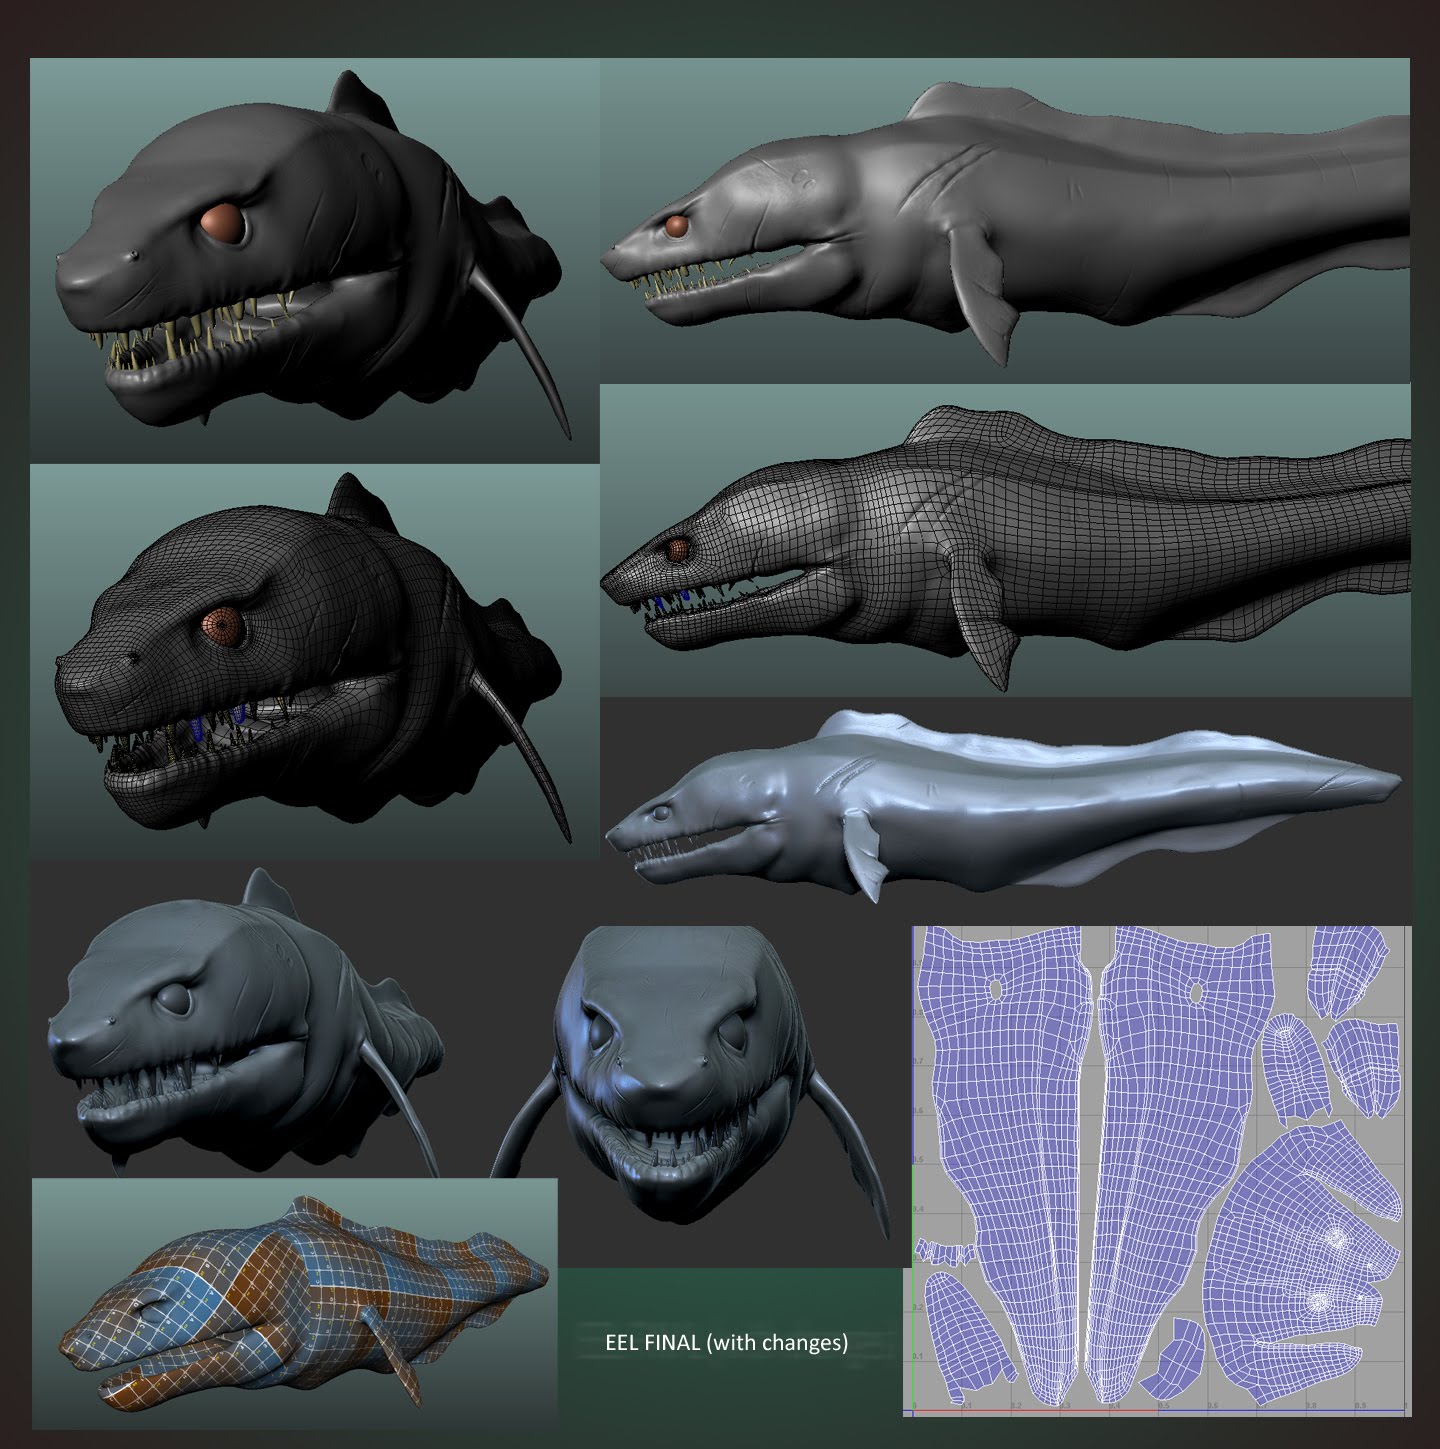
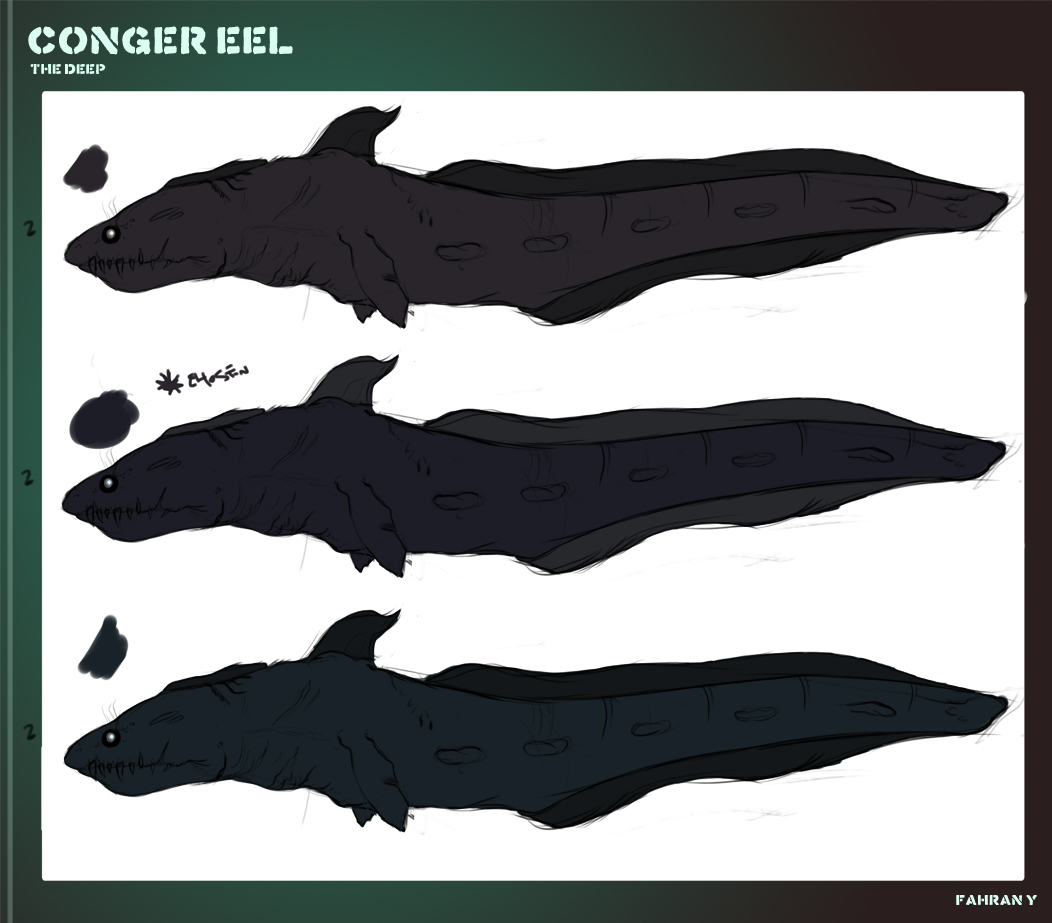
Andy's film : Conceptual Artist/Modeller/ UV mapper/ (possibly texturing & rigging)/Lighting & Rendering.

Kofi's film : Character Modeller & UV mapper

As you can see I am going to be focusing on my specialisms as well as branching out into other areas, I am very keen on lighting and rendering, and I hope to possibly get into rigging provided I learn enough of it during this term through Dan's unit. I am excited about what is ahead of us and I have faith that my groups will be able to produce work of a high standard. (If I get through all my work on time, I may be able to help out other groups, but that is a just a possibility at this moment in time).

Let the madness commence!