Monday 20 June 2011

Project Summary - Evaluation

I have learnt a lot from this project and year as a whole. I initially started the year eager to help out as many groups as I could but quickly learnt I was underestimating how much work would be involved and had to make some tough choices as to who I could and could not help. This was a major lesson I learnt, so I have always started thinking before rushing in and promising to do work which I would underestimate in terms of time scale. I learnt it is better to promise less and over deliver, than to promise lots and under deliver.

I quickly became a member of Andy's group 'The Deep' and also signed on with Kofi's project 'Heroes 1.0'. For Andy I agreed to model and texture characters, as well as do some lighting, animation and whatever would be needed. For Kofi I agreed to model his character (model/uv map/texture) and also help out where I could in terms of modelling, uv mapping etc. I also made my services available to other groups, letting them know I could UV map if possible.
I did all the work that was asked of me to a good standard and tried to always deliver as fast as possible. Being efficient and quick was a priority of mine.

It got hard to balance things at one stage, with the dissertation and IPP as well as everything we had to do for the films, but the scheduling we did and developed during Jared's unit came in very handy and allowed me to work on certain things during certain days. The stuff I learnt during Dan's unit at the beginning of the year has also helped me greatly and got me started on my journey to become a good rigger, it was just the right unit at just the right time. It allowed me to learn something new and push myself to become better. It was and probably still is the best thing I did all year. Even though my rigs were not amazing I learnt lots and got my skills up to a decent level for me to build off in my own time.

Working with groups has been quite fun and interesting, especially for such a long time. There were times I wished I had more control but quickly realised it was not my vision and just had to do the best I could to bring the director's vision to life.

The communication has been great this year, the group which is quite big has always been able to stay in touch and I have always kept people updated on my progress via our facebook group or my blog.

My strengths have been my speed, efficiency and willingness to learn and constantly better myself. I never settle with what I have now, im always pushing myself to reach a higher standard and I have definitely wanted to impress my group members and fellow workers.

My weaknesses have been scheduling and artist blocks. The scheduling took me a while to develop and even when I did sort out a timetable I still sometimes felt a bit overwhelmed. I also had art blocks which would prevent me working to the best of my ability but I found the best way to get through them is to surround myself with people and gather inspiration from my fellow peers. It helped a lot to see the great stuff that was being done and eventually pushed me to work harder. I guess I just need that creative energy around me to allow me to push myself.

It has been great working with everyone this year, and I cannot wait to get into the industry.

Thursday 16 June 2011

Shot 25 Final Lighting

For the final lighting, I actually decided to use a part of the light rig that Keith made and used for the other scenes. This is mainly because I wanted to keep continuity between the lighting in the various scenes. So I imported his light rig, deleted one of the directional lights, and added a new spot light to bring out the eel and child. I think it works well like this creating a dark mysterious look.

.

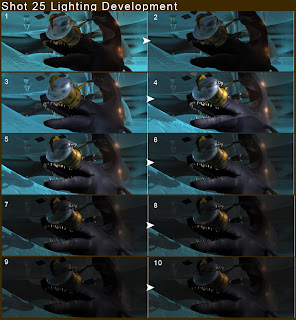
Shot 25 Lighting Development

Here is my step by step show process for the lighting of scene 25. Keith asked me to light the scene so it could be rendered later during the day. Time was of the essence so it had to be done quite soon. Here I went with the idea of less is more, so I only create as many lights as were necessary, 2 directional lights for some simple lighting of the cave and 2 spot lights for the light coming down the tunnel which is whats illuminating the eel and child. I showed Keith my inital tests, and he said they were just too bright and after going through some other scenes and renders, I understood if had to be much darker and more atmospheric. I then deleted 1 of the directional lights and dropped the intensity down on the spot lights. I had shadows being cast from one of the spot lights, using ray traced shadows. I think the lighting is decent, and a lot of tweaking will be done in post so all that is needed is a good base which I think im close too having.

Saturday 11 June 2011

Shot 16_Eel glow spheres added

Some shots of the orbs being added to the mesh of the eel in Shot 16. I was asked to do this by Keith as he desperately needed to get onto lighting and rendering the scene. As mentioned before it was a case of importing the orbs into the scene, then manually placing them all and finally using the wrap deformer, making sure to select the orb first and then the mesh.

.

Thursday 9 June 2011

Quick Render Test_Shot_25

This is just a quick and very rough render test to make sure everything in shot 25 was working after I had cleaned the scene, clearing a lot of junk out of the outliner and cleaning the hypershade out. As you can see the orbs work very well, giving a nice diffused glow and all the textures are working perfectly. The next stage for this scene is for it to be lit then rendered.

.

Glowing spheres on Eel - Shot 25

Whilst cleaning up shot 25 to be used as a master scene, I linked all the textures for the eel and then noticed that the glowing orbs were not connected to the rig, nor were they even in the scene. I got quite concerned so they are a big part of how the viewer is going to identify the eel, and mentioned this to Andy. We then called Clym and asked if he had attached those orbs to the mesh, and he said he had not. It was then a case of how to rectify this, and he suggested using the wrap deformer, to attach the orbs to the main body, as they would then follow the mesh.

So what has to be done for all shots including the eel is to manually import the orbs, and then connect them to the existing mesh using the wrap deformer. It is an easy fix, however quite tedious, as I began with shot 25. I had to go in and manually move each orb to the mesh, then attach. Its going to be worth it in the end :)

.

Eel Glow Intensity and Colour change animated test

Andy asked me if I could test out the eel's glowing orbs to make sure they could be controlled appropriately for the animation. I then quickly made this test in maya, testing the intensity as well as the colour change. (Andy wants the orbs to change colour as the eel changes moods). I simply said its a case of key framing the flow and diffuse colour attributes in the attribute editor, which is straightforward. I carried out this test, showed it to him and he was glad it all works fine.

Shot 25 Clean up and Master scene creation

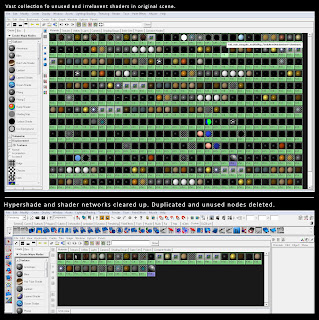
I was given the assets for shot 25 Andy, who asked me if I could clear up the scene, clear the the outliner, and re link all of the textures so that it would be good to go for lighting/rendering. When organising the scene and trying to link textures, I noticed the hypershade was extremely cluttered with nodes that had been imported with the various models. This happens when everyone has various different scenes with animation/rigs and they all create individual textures but then forget to clear the scenes before exporting out. So this has resulted in a massive amount of unused and irrelevant nodes/shader networks. I solved this by deleting all unused nodes under the edit menu in the hypershade, as well as manually going in and selecting specific nodes. After I was done, only the relevant shaders remained, and I also suggested that perhaps the scene could now be rendered on the render farm.

I asked Keith to give it a shot, and he got back to me saying the test frames he sent to the farm came back fine and it worked well. It shows that having the right scene with only the necessary nodes is how to go about using the renderfarm. Anything excess or unused is going to cause the render to fail.

I also told Andy that this scene should perhaps become the master for the ice cave, seeing as it is already clean and ready to go. He agreed and Keith has now started using this as the base for his lighting.

Artefacts when rendering

After doing some test renders of the environment using my newly created lighting I started getting this problem of artefacting throughout the image. I could not figure out why, and I began testing out the render settings, shadow samples but that did not prove any success. I then inspected the outliner and it was extremely cluttered and I began noticing duplicates of objects and then went into the viewport, switched to wireframe mode and began moving pieces around. The conclusion...there were duplicates of everyting in the scene aside from the kid, this happened because I Ben forgot to delete the entire environment when giving me the animation. So when I brought the animated kid into the lit environment, all objects were there twice. So I then had to go in and delete all the irrelevant meshes.

Interior Lighting More development, step by step

Here are some more step by steps shots and the finalised lighting. I tried using final gather but as soon as its added, the render times increase so that was not an option. I went through many little tweaks to make sure the lighting was just right, with enough bounce and I also ended up creating a light for the water to get some of that blue creeping in through the windows. All in all I think its decent, I showed it to Andy and he was happy. I created a dimly lit setting whereby the light is designed to keep the eyes focused on the child in his chair.

.

Interior Lighting

I was asked by Andy to light the interior of the submarine for shots 35/36/37/38. I tried to keep a moody setting, keeping it quite dimly lit. I ended up using 1 ambient, 1 point and 1 directional light however more tests are needed.

Tuesday 7 June 2011

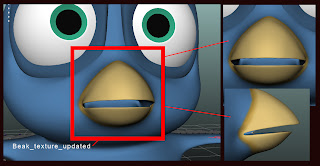
Unhatched - Beak texture

I finally got round to creating a finished beak texture for the bird in 'Unhatched'. This has taken me longer than it should have as I was so busy juggling all the work I had to do. I did apologise to Tom for the slow delivery and he said it was ok, although I still felt bad. Here is the finished beak, and it has taken quite a while to get right because of stretching within the UVs. I guess this is why Tom passed it onto me to get done, he was having trouble and it was quite tedious getting it right because of stretched UVs. I finally managed to get a decent look and added a simple border colour to match other parts of the texture. I also asked Tom what he thought and he said it was great, so all is well in the end.

Kid pyjama texture

Full shot of the new pyjama checker textures based on the original concept by Andi.


Here is the finished textures for the child, using the colour and pattern layout originally created by Andi in the final concepts. I had a little trouble with the seams, but using the warp tool in Photoshop allowed me to place and tweak the pattern as needed. Its quite a powerful tool and one I dnt normally use but in this instance it came in very very handy. I showed this stuff to Kofi via our facebook group and he was happy with the result and said its good to go. I have enjoyed texturing this kid :)

Kid_new_texture_test

Here are some work in progress shots of the kid's new texture. I have made the top in Photoshop, recreating the original pattern created by Andi. I then transformed the pattern into place to fit the UVs. There is a bit of stretching but not much can be done about that now, so I tried my best to get the pattern placed well. I think what I have so far is good as the seams look like actual seams in the clothing. Before going any further I showed this to Kofi and he was pleased with the look and told me to finish the rest, so I now need to do the trousers.

Monday 6 June 2011

To do list - This week

Next few days -

Finish the beak texture for Unhatched.

Finalise the texture for the kid in Heroes 1.0

Attempt to light the exterior for shot 39.

Carry on with working on the showreel

Finish the E & E work before the group presentation on Friday 10th and the summative/ individual hand in.

Lighting scene 35/36/37/38 - Render Trouble

Today:

So I went into class and showed Andy what I had done so far for the lighting of shots 35/6/7/8. He liked it and asked me to continue tweaking them aiming for a more darker, and dimly lit scene. I did have trouble importing the animation Ben did, because he is using Maya 2011 and I was on 2010. For some reason 2010 would not allow me to import the animation straight in from 2011, so what to be done and my way of fixing this was to first open the 2011 scene in 2010 and then resave it. This would save as a 2010 file which could then be imported in my final scene. A simple enough fix but when one does not have time to spare, every minute is costly.

We also had trouble rendering today as the render farm was not working for us, meaning we have now started taking over machines in the prototyping lab as rendering locally is our only option. We have notified Alex, and he came in to help but not much was done really, so we just had to resort to rendering locally which of course is a major pain in the ass. There is a lot to be rendered and with no working render farm its going to be close.

Saturday 4 June 2011

Submarine Interior Lighting - Shots 35/36/38

Here is the start of my lighting for the interior of the submarine. The goal is to keep things quite dark and dim, trying not to over expose things. I have started by using a simple directional, and ambient light which is working well so far. I also have tested out final gather which is just not an option really because after testing it out, the render time increases dramatically. So thats out of the question, however I am starting to get some nice results without it, using just the lights and raytraced shadows. I will keep tweaking and show Andy what I got, some feedback would be good as I could then take that onboard and develop this further in the right direction.

.

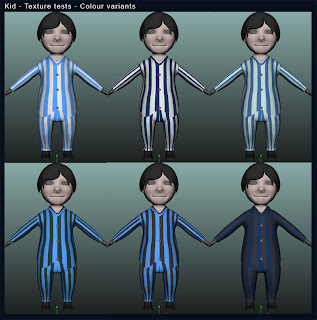
Kid - Texture variants

After getting the initial feedback from Kofi that the child's textures were not right and too bright, making it look like candy I said I would do some colour variations to see what he likes. I did these tests to show some various mixs using colours from the same palette. He saw these and was not that keen and then said to perhaps try using the colour pattern that Andi had used in the final concept. I said that was fair enough and I will try to get a test of that done as soon as possible. This kind of feedback is useful and Kofi has a clear vision in mind as director, which I am happy to follow and bring to life.

.

SSS_kid_tests_Heroes

Kofi has asked me test out SSS for the kid's skin, and try to create a basic shader and light setup we could use. Her I have used 1 directional light and tweaked the individual SSS layers to get a decent look. I told Kofi the shader was sorted and I only used 1 directional light to try and match the light source of the room. The problem however is that the SSS will need new lights for each and every scene as the kid will be in different places, I explained this to Kofi and he said thats fine. I did say however it might be quite a long process and mentioned perhaps just using a blinn or a simple shader would be beneficial. He said perhaps but first he would try to tweak the SSS.