Wednesday, 27 April 2011

Frank UV Mapped

Chris Caldow from 'Patience' had asked me if I would be able to UV map their character for them, as they were in desperate need of the model being rigged so getting the UV maps sorted for texturing had to be done asap. The model came with a few props/mainly clothing so I started by unwrapping the body and the moving onto the clothing. I mainly used automatic mapping, and the selected specific sections of the meshes which I would then unwrap again for a cleaner shell and easier handling of the UVs. As mentioned previously this has become my standard workflow for unwrapping, and as sad as it is, I still thoroughly enjoy UV mapping.

Final Camera Textures

I was asked by Andy (director of 'The Deep') to texture the camera that the child would be using throughout the film. Once again, seeing as this is quite a small prop and looking through the storyboards, I decided to keep the textures relatively simple and stylised. I unwrapped the camera in maya, grouping together individual meshes, so that they could share the same UV space ( I also grouped together parts of the camera that shared the same material).

The top image is a picture I used a reference as I thought it would suit the model well, going for an overall brown tone with yellow/gold hinges/accessories. I used a metal/bronze texture for the main part of the camera, and then I went in and manually painted in the dirt/grime details. The hinges and smaller pieces were just coloured using a simple blinn shader with fractal node plugged into it. It achieved a good effect. Once this was done I passed the asset over to Andy who was happy with it.


New Uv map for heroes child

The head of the child had been changed, mainly due to aesthetic reasons so it had to be remapped in order for a texture to be created and applied. Kofi and Clym had gone through a few tweaks for the kids head, and as a result it needed unwrapping. I had a look at the map, and I did try to tweak what was left of the original, but decided it was taking too long and came to the conclusion I should just redo it. In all I think I spent maybe 20mins redoing it, which is good and promptly sent the file Kofi's way. I feel like I have defintely had a good amount of practice with UV mapping so far this year, and as result I think im getting much faster and more efficient.

Sunday, 13 March 2011

Kid helmet texture

A few shots of the textures for the kid (The Deep). It is quite a simple texture, made in Photoshop. I used a photo of some brass/metal sheets which I layered up with some dirt. I drew up those four holes on the back to give some detail. It is not my best nor most detailed texture work but seeing as our environment for the film is underwater, with a lot of intense/dark atmospheric lighting, it is not even going to be that visible for most of the duration of the film. So the thinking behind it is to give depth which is relevant and not go crazy when the final results will not even display the full thing.

Uv map for kid's head (Heroes 1.0)

Here is a shot of the child's face UV mapped in maya. What I did for this was fairly straight forward, automatic map half the face, and planar map certain sections, which I could easily stitch together efficiently. This has become my preferred method of unwrapping (utilising the different projection methods together). I used to exclusively use automatic mapping, which was quite stupid as the amount of pieces generated can sometimes be extreme. So what I always tend to do now through practice is to automatic map the model, then break down sections with planar mapping for example. I find it to be a great workflow and saves alot of time.

I did this map as fast as I could as always. My goal with uv mapping is to get through it as fast as possible whilst maintaining a high standard of quality. While I do enjoy it, I also get bored sometimes as it is not the most artistic part of 3D. None the less, it usually is fun, the key is to treat it like a big puzzle.

Wednesday, 9 March 2011

Textures for kid

So I spoke to Andy in class on monday, and he basically told me once I am done with the blendshapes I am to texture the kid. So having now finished the blendshapes and passed them onto Clym, I began texturing. So far I have done the air tank, the head and body. The texture for the body was made using the normal map as a base, and I painted some very subtle tones on the kids head. These two are both quite subtle as I did not want to take away from the simplicity of the model. For the air tank, I used the sub and Andy's drawings as ref, so they look similar. I will see what Andy thinks next. I used Photoshop for the texturing and uv mapped what was needed in maya.

Tuesday, 8 March 2011

New blendshapes done

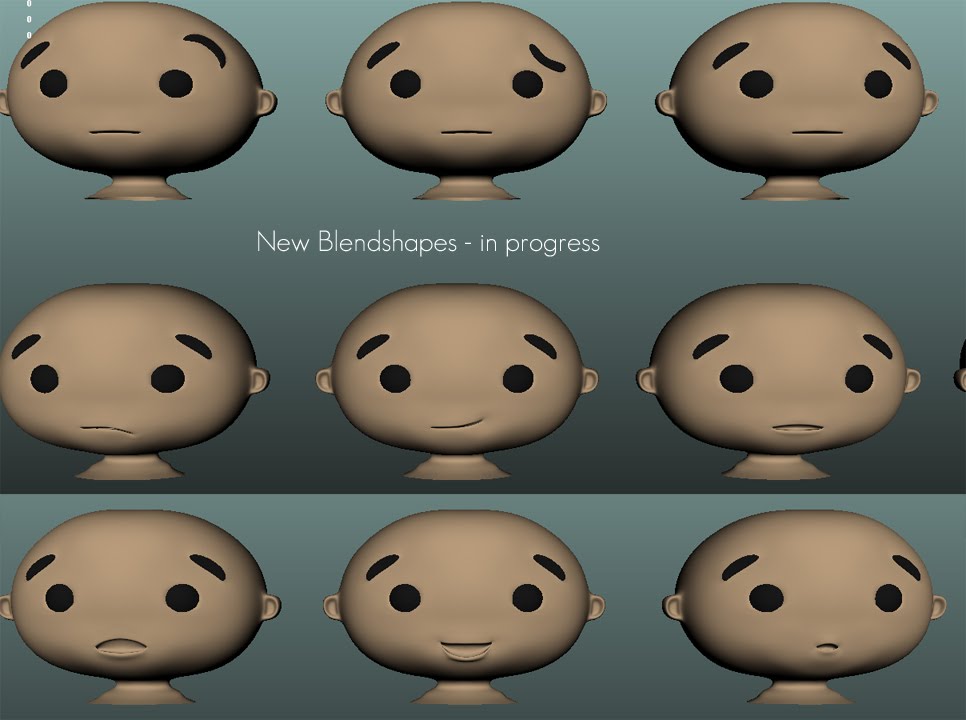
Right, so I have finished the blendshapes for the kid, I used the facial ref sheet Andy provided to create them. I think I have done all the ones needed, although Clym will let me know if anything extra is needed as I am going to pass them onto him now. All that is left is to mirror the left side shapes to create the right and everything will be done. Clym did show me a technique for it but I seem to have forgotten a step so I will ask him to see if he can do it, unless he wants to show me again. Here is a shot of the shapes.

Sunday, 6 March 2011

New blendshapes

So after UV mapping the head, I have now gotten onto work on creating brand new blendshapes for this head. It annoys me because it means I wasted time making the previous blendshapes which are of no use now, but oh well, guess these things happen. I have done quite a few already, mainly with the mouth, I will get the rest done tomorrow in class.

UV mapped kid head

Here is a shot of the uv map for the childs head. There is close to no stretching, and since the majority of the head is hidden underneath the hat I did not really worry about seams. The face is the most important area so that is more or less perfect.

Deadline for monday for the kid

So the whole group was in on monday, and I showed Clym the blendshapes I had done. He was happy with them and then we had a discussion with Andy about the character. He basically said he wants the character finished/ ready to be rigged by monday (7th March), so we can get to animating as soon as possible. So Clym just needs to add his tweaks and we will be ready, as I finished my part already.

Edit* The model is now ready, but because the head was not uv mapped prior to me making the blendshapes I am going to have to redo them once I have mapped the head.